Picture your biggest sale of the year. The email goes out at 9 a.m., the social posts go live, and within ten minutes your traffic jumps tenfold. Then the site slows to a crawl, pages start timing out, and your support inbox fills up with angry messages.
That’s usually the moment a team learns what a load balancer is actually for. If you’ve been looking for load balancing explained in plain English, this guide is for you. We’ll cover what load balancing is, how it works, which algorithms and network layers matter, and how tools like Proxy and Nginx put it all into practice.
You don’t need a networking degree to follow along. By the end, you’ll know how to spread traffic across your servers, keep your site online when demand spikes, and choose a setup that fits your project.
Let’s start with the basics.
What Is a Load Balancer? Load Balancing Explained Simply
Think of a busy supermarket. If every shopper lined up at a single checkout, the queue would stretch out the door. So the store opens several lanes, and a staff member at the front waves each customer toward the shortest line. Nobody waits too long, and no single cashier burns out.
That’s load balancing in a nutshell. Load balancing is the practice of distributing incoming network traffic across several servers so that no single machine carries the whole burden.
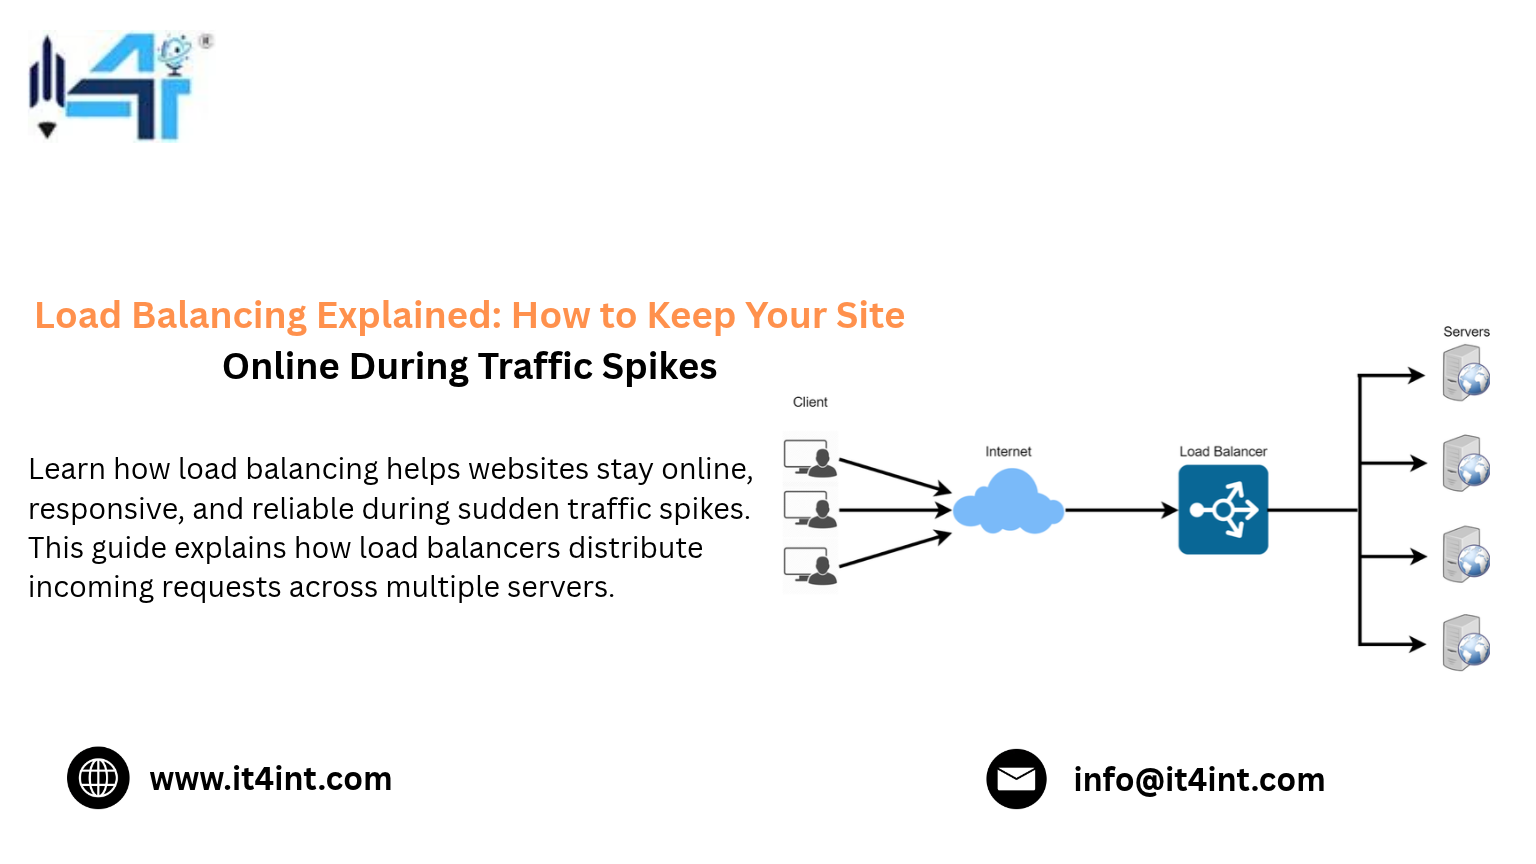
So, what is a load balancer? It’s the person at the front of the store. A load balancer is a piece of hardware or software that sits between your visitors and your servers. It receives every request, decides which server should handle it, and passes it along. To the visitor, it all looks like one website at one address.
The benefits go well beyond speed:
- Availability. If one server crashes, the load balancer stops sending it traffic and the site keeps running.
- Scalability. Need more capacity? Add servers behind the balancer. Visitors never notice.
- Performance. Spreading requests evenly keeps response times low, even at peak.
- Easier maintenance. You can pull a server out of rotation to patch it without taking the site down.
Without load balancing, a single server is a single point of failure. With it, a bad day for one machine is just a minor blip.
How Does a Load Balancer Work?
Here’s the flow, step by step:
- A visitor types in your address. DNS points them to the load balancer’s IP address, not to any individual server.
- The load balancer receives the request. It checks which servers in its pool are healthy.
- It picks a server. Using a set algorithm (more on those in a moment), it decides where the request goes.
- The server responds. The reply usually travels back through the load balancer to the visitor.
- The cycle repeats, thousands of times per second if it has to.
Step 2 is what keeps your site alive. Load balancers run health checks, which are small, regular pings to each server. A check might request a simple page every few seconds. If a server stops answering or starts returning errors, the balancer marks it as down and routes around it. When the server recovers, it rejoins the pool on its own.
Two more features are worth knowing about:
- Session persistence (sticky sessions). Some apps need a visitor to keep landing on the same server, for example to hold a shopping cart in memory. The balancer can remember who went where using a cookie or the visitor’s IP address. If you can, store sessions in a shared place like Redis instead, so any server can pick up any visitor.
- SSL/TLS termination. Instead of making every server decrypt HTTPS traffic, the load balancer handles encryption once at the front door. Your servers can then focus on running the application.
Load Balancing Algorithms: Round Robin and Beyond
The algorithm is the rulebook your balancer follows when it picks a server. The right one depends on your traffic and on how similar your servers are.
Round robin load balancing
Round robin load balancing is the simplest method. Requests go to servers in order: server A, then B, then C, then back to A. It’s easy to understand, easy to configure, and it works well when your servers are about equally powerful and requests take roughly the same time to handle.
The catch is that round robin doesn’t look at what’s actually going on. If one server is stuck on a heavy request, round robin will keep feeding it more work anyway.
Weighted round robin
This is the same rotation, but you give stronger servers a bigger share. A server with a weight of 3 receives three requests for every one that a weight-1 server gets. It’s a good fit when your machines aren’t identical.
Least connections
Each new request goes to the server with the fewest active connections. This shines when requests vary a lot in length, such as file downloads, long API calls or WebSocket sessions, because busy servers naturally get a break.
IP hash
The balancer uses the visitor’s IP address to choose a server, so the same visitor usually lands on the same machine. It’s a simple way to get sticky behavior without cookies. The downside is uneven distribution when lots of users share one IP, like everyone in a large office.
Least response time
Some balancers also weigh how quickly each server is responding. A server that’s answering fast gets more traffic, and a slow one gets less.
Not sure where to start? Begin with round robin if your servers are identical, or least connections if your requests are uneven. You can always switch later once you’ve seen real traffic patterns.
Layer 4 vs Layer 7 Load Balancing
You’ll see “layer 4 vs layer 7” in almost every load balancing discussion. The layers come from the OSI networking model, and they describe how much of each request the balancer can understand.
Layer 4 (transport layer) balancers work with TCP and UDP. They see IP addresses and port numbers, but not what’s inside the traffic. Because they don’t open the package, they’re very fast and use few resources. They also work with any protocol, which makes them a solid pick for databases, mail servers, game servers and other non-web traffic.
Layer 7 (application layer) balancers understand HTTP and HTTPS. They can read URLs, headers and cookies, so they can make smarter choices. Send /api requests to your API servers, /images to a media cluster, and logged-in users to a different pool. They can also handle SSL termination, compression, caching and URL rewrites.
| Layer 4 | Layer 7 | |
| What it sees | IP addresses, ports | URLs, headers, cookies, content |
| Speed | Very fast | A bit slower (more inspection) |
| Routing logic | Basic | Content-aware and flexible |
| Best for | Raw TCP/UDP, databases, high throughput | Websites, APIs, microservices |
| Extras | Few | SSL termination, caching, rewrites |
So which one should you pick? For most websites and web apps, layer 7 is the better default because the flexibility is worth the small speed cost. If you’re moving huge volumes of simple traffic, or balancing something that isn’t HTTP, layer 4 makes more sense. Plenty of larger setups use both: a layer 4 balancer at the edge to absorb raw volume, with layer 7 balancers behind it handling the clever routing.
Dedicated Server Plans
Power your growing business with IT4INT reliable infrastructure built for demanding workloads, with high performance, advanced security, and flexible configurations tailored to your needs.
HAProxy: The Load Balancing Specialist
HAProxy (short for High Availability Proxy) is a free, open-source load balancer with a long reputation for speed and stability. Busy sites have trusted it for years, and it does one job very well: moving traffic around.
It can run at layer 4 (mode tcp) or layer 7 (mode http), so one tool covers both approaches from the last section. A few things people like about it:
- Detailed health checks that go beyond a simple “is the port open?”
- ACLs for content-based routing, such as sending certain paths or hostnames to specific servers
- Stick tables for tracking clients, which you can use for rate limiting and basic abuse protection
- A built-in stats page that shows live traffic, errors and server status
- A runtime API, so you can drain or add servers without a full restart
Here’s a minimal example that balances three web servers using round robin:
defaults
mode http
timeout connect 5s
timeout client 30s
timeout server 30s
frontend web_front
bind *:80
default_backend web_servers
backend web_servers
balance roundrobin
option httpchk GET /health
server web1 10.0.0.11:80 check
server web2 10.0.0.12:80 check
server web3 10.0.0.13:80 check
The frontend listens for visitors, the backend lists your servers, and the check keyword turns on health checks for each one. Swap roundrobin for leastconn and you’ve changed algorithms with a single word.
The trade-off? HAProxy’s configuration has a learning curve, and it isn’t a web server, so it won’t serve your static files itself. Think of it as a dedicated traffic director.
Nginx Load Balancer: Web Server and Traffic Director in One
Many teams already run Nginx as their web server, which is exactly why the Nginx load balancer is so popular. You can turn on load balancing in a setup you already know, without adding another tool to the stack.
Nginx is a layer 7 balancer for HTTP and HTTPS by default, and it can also proxy raw TCP and UDP traffic through its stream module. Out of the box it uses round robin, and you can switch to least_conn or ip_hash with one line.
Here’s a simple example:
upstream backend_servers {
least_conn;
server 10.0.0.11:80 weight=3 max_fails=3 fail_timeout=30s;
server 10.0.0.12:80 max_fails=3 fail_timeout=30s;
server 10.0.0.13:80 backup;
}
server {
listen 80;
location / {
proxy_pass http://backend_servers;
proxy_set_header Host $host;
proxy_set_header X-Real-IP $remote_addr;
}
}
A few details worth noticing. The weight setting gives the first server a larger share of traffic. The max_fails and fail_timeout settings pull a server out of rotation for 30 seconds after three failed attempts, which is a simple form of passive health checking. And the backup server only receives traffic when the others are unavailable.
Nginx shines when you want one tool that serves static files, caches content, terminates SSL and balances traffic. The main limitation is that active health checks (where Nginx proactively probes servers) are a feature of the paid Nginx Plus. On the open-source version, you’ll rely on the passive checks above or add an external monitor.
HAProxy or Nginx? If load balancing is your main job and you need deep traffic control, HAProxy is a great fit. If you want a flexible all-rounder that also serves your site, Nginx is hard to beat. Plenty of teams happily run both.
How to Keep Your Site Online During Traffic Spikes
A load balancer is a big step forward, but it isn’t magic. These habits are what separate sites that shrug off a spike from sites that fall over:
- Remove single points of failure. A lone load balancer is itself a single point of failure. Run two as an active-passive pair (tools like Keepalived can handle the failover) or use a managed cloud load balancer that does this for you.
- Add autoscaling. Connect your balancer to autoscaling so new servers join the pool automatically when CPU or request counts climb, and leave when things calm down.
- Keep servers stateless. Store sessions in Redis or a database rather than on one machine. Then any server can handle any visitor, and you won’t need sticky sessions.
- Cache what you can. A CDN and page caching take pressure off your servers. The cheapest request is the one that never reaches them.
- Set rate and connection limits. Cap how many requests a single client can make, and how many connections each server accepts. It’s better to queue or reject a few requests than to let one server collapse.
- Write meaningful health checks. Point them at a real endpoint, like /health, that confirms the app and its database are working. A server that’s “up” but can’t reach its database shouldn’t receive traffic.
- Load test before the big day. Tools like k6, Apache JMeter and Locust let you simulate a spike on purpose, so you find the weak spot before your customers do.
- Monitor and alert. Watch error rates, latency and active connections. A rising error rate is your early warning, and you want to see it before your users do.
Read More : Hybrid Cloud Architecture: A Practical Setup Guide for Growing Businesses
Final Thoughts
Load balancing comes down to one simple idea: don’t let any single server carry everything. Spread the work, check that your servers are healthy, and route around trouble before your visitors ever see it.
Start small. Pick an algorithm that matches your traffic (round robin is a fine first choice), decide whether you need layer 4 speed or layer 7 intelligence, and set up either HAProxy or Nginx in a test environment. Then run a load test and watch what happens. You’ll learn more in an hour of testing than in a week of reading.
When the next traffic spike arrives, whether it’s a product launch, a viral post or a holiday sale, you’ll be ready for it instead of scrambling.